
oops - wrong reference
Sometimes i really miss that post editing feature but.. OK.. here is the correct link!

Results 2,376 to 2,400 of 3103
-
23-01-2019, 09:29 PM #2376Freelance Astronaut


- Join Date
- Sep 2016
- Last Online
- 23-02-2024 @ 12:36 AM
- Location
- Thailand...just Thailand!
- Posts
- 2,103
-
24-01-2019, 01:55 AM #2377Thailand Expat


- Join Date
- Jan 2016
- Last Online
- @
- Location
- Palace Far from Worries
- Posts
- 14,393
Doors look sweet, but I question your choice of entry lighting Originally Posted by Thai Dhupp


Make sure the door is painted/sealed on the underside.
If it's not, moisture can be absorbed and possible warping.
Obviously the doors have been trimmed to fit and the bare wood is on display above.
BTW, will it be a Thai style 'shoes off' home?
Ours, in the West is ... and I prefer that.Someone is sitting in the shade today because someone planted a tree a long time ago ...
-
24-01-2019, 03:38 AM #2378On a walkabout

- Join Date
- Jun 2008
- Last Online
- @
- Posts
- 30,531
Plenty of "WOW" factor with regard to your interior design TD.
Well done.
-
24-01-2019, 10:42 AM #2379Freelance Astronaut
- Join Date
- Sep 2016
- Last Online
- 23-02-2024 @ 12:36 AM
- Location
- Thailand...just Thailand!
- Posts
- 2,103
That's a really good call David, definitely something I would not have thought of. Originally Posted by David48atTD
Message sent to K.Pot this morning via PJ.
Shoes off - shoes on...?
Well... I tend to do it when i get back to the apartment here in Dubai, we have always doe it in the apartment we have in BKK.
I even did it in UK long before meeting PJ or living in Thailand
Shoes off , all the way...!
-
24-01-2019, 10:46 AM #2380Freelance Astronaut
- Join Date
- Sep 2016
- Last Online
- 23-02-2024 @ 12:36 AM
- Location
- Thailand...just Thailand!
- Posts
- 2,103
Originally Posted by Loy Toy
Thanks for that kind comment LT...
One is never sure if its all going to come together. I had an idea in my head and for the first time (Never happened in UK) I had a chance to put it into reality...
...if it turns out to not work we can always paint over and re-do, even change floor tiles, I suppose.
I am even starting to 'accept' those ground floor WC floor tiles (I did not choose them!)
-
24-01-2019, 12:03 PM #2381Freelance Astronaut
- Join Date
- Sep 2016
- Last Online
- 23-02-2024 @ 12:36 AM
- Location
- Thailand...just Thailand!
- Posts
- 2,103
Shutters
A few shots no that K.Pot is well on the way to fitting the shutters and window frames...

You can see... he is also starting to fit the folding window frames too.
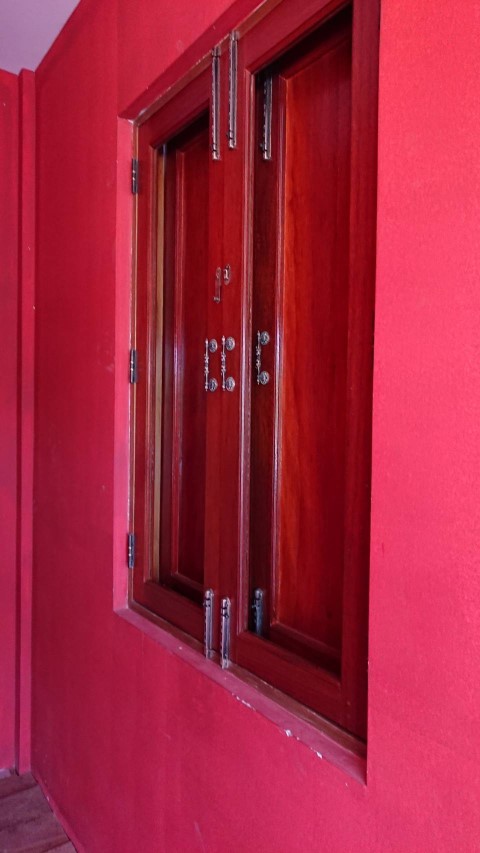
In the dining room. in this photo you can see both the shutters (open out) and the windows (open in)

When closed the shutters are flush with the wall

Same shot but from inside

Both door and window shutter closed under zone 2

Another view looking towards the dining room
-
24-01-2019, 12:15 PM #2382Freelance Astronaut
- Join Date
- Sep 2016
- Last Online
- 23-02-2024 @ 12:36 AM
- Location
- Thailand...just Thailand!
- Posts
- 2,103
WC Door
You remember K.Pot already fitted a couple of doors he got from Bunthavorn (they were the 80cm doors)

So now hes on with painting them to match the door surround. Here's the first coat:

Needs to be a bit darker yet...
-
24-01-2019, 01:04 PM #2383Thailand Expat
- Join Date
- Jan 2016
- Last Online
- @
- Location
- Palace Far from Worries
- Posts
- 14,393
Mate, ignoring the noise (car and bricks) at the front of the image ... that shot does display some really nice elements of your build. Originally Posted by Thai Dhupp
---
Oh, with the doors, difficult to prove with the heavy entrance doors (sealing of the underside) but with the bathroom doors (they are the ones which will give you the most problems, remove all but the top screw attached to the door frame. Loosen it and gently 'swing the door up until you can see the underside.
Trust (your builder) but verify
-
24-01-2019, 01:58 PM #2384Freelance Astronaut
- Join Date
- Sep 2016
- Last Online
- 23-02-2024 @ 12:36 AM
- Location
- Thailand...just Thailand!
- Posts
- 2,103
Thanks for that, David. Originally Posted by David48atTD
Yes.. we will be verifying those doors when they come to site - about 1 week away now. actually, those doors are Mae Daeng so there is some extra protection from that too
Re. the dragon doors - message was passed this morning to K.Pot
-
24-01-2019, 03:10 PM #2385Member
- Join Date
- Sep 2007
- Last Online
- Today @ 03:40 PM
- Location
- Ubon Ratchathani
- Posts
- 412
Be prepared for one little thing with those frames flush against the wall .....the hooks will swing in the wind and scrape the paint off the wall, also water will drip down them leading to stains down the wall. Originally Posted by Thai Dhupp
But overall looking very nice, I hope your landscaping skills will match K. Pot’s building skills ....he is going to be a hard act to follow !
-
24-01-2019, 03:14 PM #2386Member
- Join Date
- Sep 2007
- Last Online
- Today @ 03:40 PM
- Location
- Ubon Ratchathani
- Posts
- 412
Forgot to add, perhaps add some eyelets in the frames for the hooks to sit in, rather than just hanging down ?
-
24-01-2019, 03:22 PM #2387I'm in Jail
- Join Date
- Jan 2013
- Last Online
- 20-04-2024 @ 03:45 PM
- Location
- Bungling in the jungle
- Posts
- 10,387
Looking good. If I only had the foresight ten tears ago. But that would be another story.
fish
-
24-01-2019, 04:06 PM #2388Freelance Astronaut
- Join Date
- Sep 2016
- Last Online
- 23-02-2024 @ 12:36 AM
- Location
- Thailand...just Thailand!
- Posts
- 2,103
Thanks for the encouraging comment, Fish... Originally Posted by fishlocker
I remember you said yours is an ongoing project so.its never too late to make a few err... 'modifications' to the old homestead... whats to stop you!?
...and then you could update us here with a new thread!
-
24-01-2019, 04:07 PM #2389Freelance Astronaut
- Join Date
- Sep 2016
- Last Online
- 23-02-2024 @ 12:36 AM
- Location
- Thailand...just Thailand!
- Posts
- 2,103
I will take a look at 'what to do' when i get here Mike, but the 'eye' idea is not bad Originally Posted by mikenot
-
24-01-2019, 04:14 PM #2390Freelance Astronaut
- Join Date
- Sep 2016
- Last Online
- 23-02-2024 @ 12:36 AM
- Location
- Thailand...just Thailand!
- Posts
- 2,103
Boundary wall - capping and rendering

Looking across from the road to the back wall

More capping beam being cast
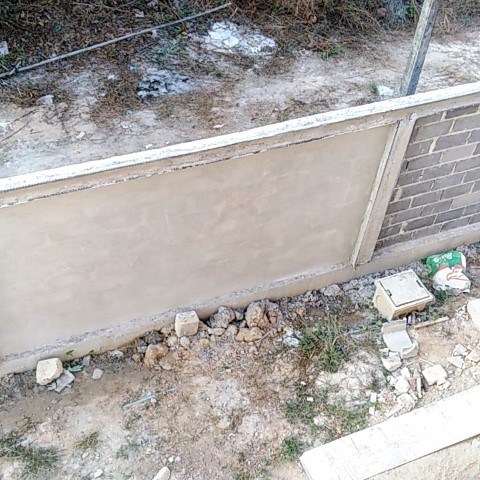
Once cast, the build team start on the rendering

Standing by the back wall with the house on the left, and looking towards the Chonburi Hilton, which apparently will soon be closing down
-
24-01-2019, 06:20 PM #2391Freelance Astronaut
- Join Date
- Sep 2016
- Last Online
- 23-02-2024 @ 12:36 AM
- Location
- Thailand...just Thailand!
- Posts
- 2,103
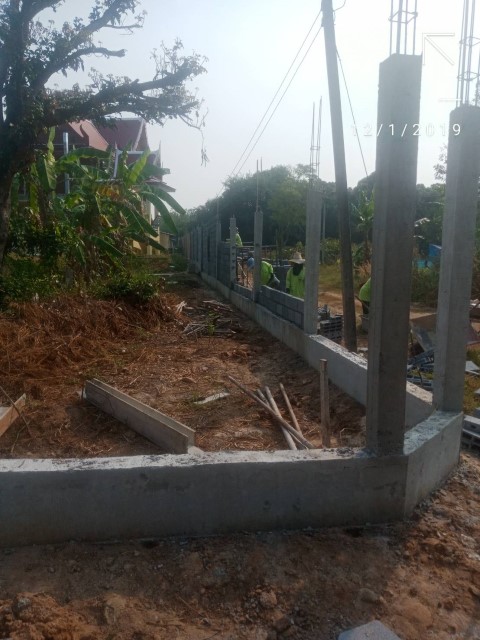
Boundary wall - making a start on the front (road) side
They left this til the end, dunno why but anyway... time to start forming the wall at the front

Picture looking down the road with the plot / house on the right (I have a degree in stating the beedin' obvious...)

Steel in place to form the lower beam - steel uprights already set ino the ground after piling

Ah ha! ...so THATS where K.Pot is storing all his bamboo scaffolding!

This is where the car / pedestrian gate and door will be
-
26-01-2019, 01:57 PM #2392Freelance Astronaut
- Join Date
- Sep 2016
- Last Online
- 23-02-2024 @ 12:36 AM
- Location
- Thailand...just Thailand!
- Posts
- 2,103
Balcony boss and ongoing frame fitment
You remember when i was there before, we had to go to Bangkok to get 'the right' boss for the balcony and staircase rails?
We did get them, and now they are being fitted.

PJ elected to paint them in the same gold as the window frame detail

Actually, I think it looks good...

Meanwhile the upper window frames and shutters continue to be installed
-
26-01-2019, 05:26 PM #2393Freelance Astronaut
- Join Date
- Sep 2016
- Last Online
- 23-02-2024 @ 12:36 AM
- Location
- Thailand...just Thailand!
- Posts
- 2,103
Boundary wall - around 'MangoLand
Still pushing on with the wall - now we are coming around the bottom of the plot.
turning the corner...
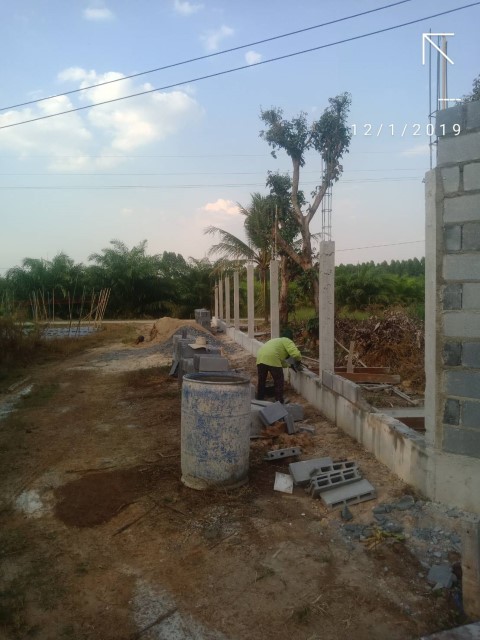
more blockwork


-
27-01-2019, 02:14 PM #2394Freelance Astronaut
- Join Date
- Sep 2016
- Last Online
- 23-02-2024 @ 12:36 AM
- Location
- Thailand...just Thailand!
- Posts
- 2,103
Boundary wall - capping
The last thing to do once the wall is to height is add the capping beam
Here's a couple of shots showing this process in action


After that construction is over, fish with rendering and pint.
-
27-01-2019, 02:41 PM #2395Thailand Expat

- Join Date
- Mar 2006
- Last Online
- Today @ 12:55 PM
- Location
- Flat Earth
- Posts
- 4,004
What about drainage? would it be an idea to put some pipe through lower wall before finishing, or no need?
The reason I ask is I didn't have drainage and had to go back and put in.
-
27-01-2019, 06:04 PM #2396Freelance Astronaut
- Join Date
- Sep 2016
- Last Online
- 23-02-2024 @ 12:36 AM
- Location
- Thailand...just Thailand!
- Posts
- 2,103
Hi AP2....We spoke to K.Pot before so I'm hoping he has it in hand...however I can't actually see it in place so maybe not. Originally Posted by Airportwo
I guess its as hard as boring a few holes at a low level to allow water a passage to escape?
I am still checking it with him, tho hes 'off' today.
We will have something in place as I don't want to be 'living on an island'(music's good tho - cheers Status Quo and David Gilmour)
-
27-01-2019, 07:39 PM #2397Thailand Expat
- Join Date
- Mar 2006
- Last Online
- Today @ 12:55 PM
- Location
- Flat Earth
- Posts
- 4,004
The soil here resembles "quicksand" when it is wet, just collapses on itself, best to check he has given drainage some thought, given his performance so far he may well have done. Originally Posted by Thai Dhupp
-
27-01-2019, 08:25 PM #2398Freelance Astronaut
- Join Date
- Sep 2016
- Last Online
- 23-02-2024 @ 12:36 AM
- Location
- Thailand...just Thailand!
- Posts
- 2,103
Dennis..Hi!! Originally Posted by dennis4558
Sorry for the delay in replying .. K.Pot says around 2.8M each one
-
27-01-2019, 08:29 PM #2399Freelance Astronaut
- Join Date
- Sep 2016
- Last Online
- 23-02-2024 @ 12:36 AM
- Location
- Thailand...just Thailand!
- Posts
- 2,103
if not I would probably make a small area of gravel next to the wall (between soil and wall) with a geo-tex membrane around it, and bore through and bore through the wall behind the gravel. Originally Posted by Airportwo
-
27-01-2019, 10:03 PM #2400Thailand Expat

- Join Date
- Aug 2014
- Last Online
- 26-09-2021 @ 10:28 PM
- Posts
- 10,105
So in one of the next zone you can erect easily another high rise building on it, can't you? Originally Posted by Thai Dhupp


 Reply With Quote
Thread Information
Users Browsing this Thread
There are currently 2 users browsing this thread. (0 members and 2 guests)
